- 1. 概要
- 2. 設定
- 3. 編集
- 4. 表示
1. 概要

 「Conky」は、「Unix」「Linux」で動作する、タスクマネージャです。
 詳細は、「Conky - Wikipedia」をご参照ください。
 「MX Liunx」では、「Conky」は、デフォルトでインストールされていますし、自動起動の設定もされています。
 が、それは、「XFCE」「KDE」「Fluxbox」でのこと。
 「LXDE」では、起動設定が必要です。

2. 設定

 ログインユーザで。


vi ~/.icewm/startup


 末尾に下記の行を加えます。


sh /usr/share/mx-conky-data/conky-startup.sh


 ログインしなおすと、下記の表示が現れます。

/usr/share/mx-conky-data/conky-startup.sh


 の中身は。


#!/bin/bash
#Launch default MX Conky script unless otherwise configured

#check for presence of desktop autostart file
#or if autostart is disabled in existing file


#launch HOME configured conky, if it exists
#check for existence, because conky-manager does not make executable files
#start with sh for compatibility
if [ -f "$HOME/.conky/conky-startup.sh" ]; then
        sh "$HOME/.conky/conky-startup.sh"
        exit 0
fi

#special first boot stuff
if [ "$XDG_CURRENT_DESKTOP" = "XFCE" ]; then
        while ! pidof xfdesktop >>/dev/null;
                do
                        sleep 1
                done
fi

if [ ! -e "$HOME/.cache/fontconfig" ] && [ -d /usr/share/fonts/extra ]; then
        fc-cache -r /usr/share/fonts/extra
fi

#ok we finally launch default conky if nothing all checks are passed
sleep 20
killall conky
cd "/usr/share/mx-conky-data/themes/MX-Infinity"
conky -c "/usr/share/mx-conky-data/themes/MX-Infinity/MX-Infinity-conkyrc" &
exit 0


 となっております。

3. 編集

 末尾に「システム情報」「ディストリビューション」「デスクトップ名」「Conky バージョン」「IP アドレス」を表示します。
 「root」ユーザ権限で。


cp /usr/share/mx-conky-data/themes/MX-Infinity/MX-Infinity-conkyrc /usr/share/mx-conky-data/themes/MX-Infinity/MX-Infinity-conkyrc.bak
vi /usr/share/mx-conky-data/themes/MX-Infinity/MX-Infinity-conkyrc


minimum_width = 175,
maximum_width = 175,


 幅が足りなくなるので広げます。


minimum_width = 350,
maximum_width = 350,


 末尾の。


]];


 の前に以下を記述します。


${offset 0}${voffset 210}\
${color}System      :$color $sysname $kernel
${color}Architecture:$color $machine
${color}Description :$color ${execi 999999 lsb_release -ds}
${color}Desktop     :$color ${execi 999999 echo $DESKTOP_SESSION}
${color}Conky       :$color $conky_version
${color}Local  IP   :$color ${addr eth0}
${color}Global IP   :$color ${execi 999999 curl -s inet-ip.info}


4. 表示

 編集後、「Conky」の表示がこのようになります。
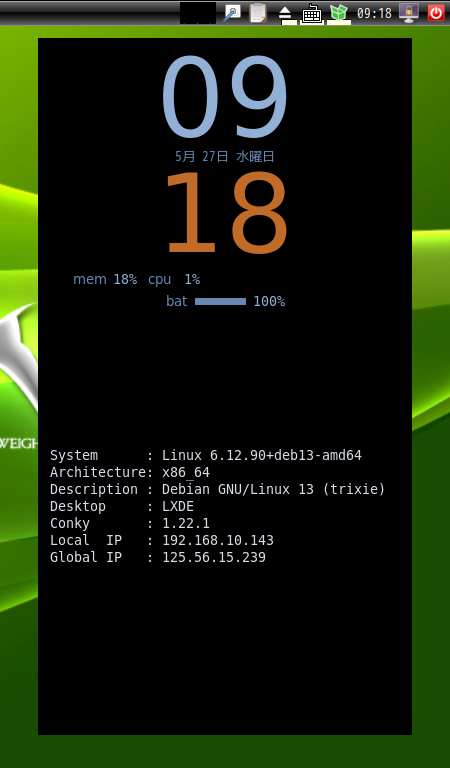
透過できないのが、つらいところです。
|