ここまでの時点で、システムインストールと「VirtualBox Guest Additions」の設定は終わっているものとします。
 ぞれぞれのインストール・設定に関しては

	「FreeBSD - デスクトップ環境構築 - 共通事項 - システムインストール」
	「FreeBSD - デスクトップ環境構築 - 共通事項 - VirtualBox Guest Additions」

 をご参照ください。

2. インストール

 下記の手順で、インストールします。


pkg install -y xorg numlockx ja-font-migmix
pkg install -y sddm sddm-freebsd-black-theme cursor-neutral-white-theme


pkg install -y py311-qtile gdk-pixbuf2


 「py311-qtile」なのは、このバージョンの「FreeBSD」の「python」のデフォルトが、「python3.11」だったからです。
 「gdk-pixbuf2」というのを一緒にインストールしないと、エラーになります。

 バージョンの推移です。

	・2020年 9月 4日	「FreeBSD 11.4 RELEASE」	「qtile-0.15.0」
	・2020年11月13日	「FreeBSD 12.1 RELEASE」	「qtile-0.15.0」
	・2021年 7月 1日	「FreeBSD 13.0 RELEASE」	「qtile-0.15.0」
	・2021年11月13日	「FreeBSD 12.2 RELEASE」	「qtile-0.15.0」
	・2022年 1月 4日	「FreeBSD 12.3 RELEASE」	「py38-qtile-0.18.1」
	・2022年 5月25日	「FreeBSD 13.1 RELEASE」	「py38-qtile-0.18.1_1」
	・2022年12月19日	「FreeBSD 12.4 RELEASE」	「py39-qtile-0.18.1_1」
	・2023年 5月 9日	「FreeBSD 13.2 RELEASE」	「py39-qtile-0.18.1_1」
	・2024年 1月15日	「FreeBSD 14.0 RELEASE」	「py39-qtile-0.18.1_3」
	・2024年 3月14日	「FreeBSD 13.1 RELEASE」	「py39-qtile-0.18.1_3」
	・2024年 6月11日	「FreeBSD 14.1 RELEASE」	「py39-qtile-0.18.1_3」
	・2024年10月 7日	「FreeBSD 13.4 RELEASE」	「py39-qtile-0.18.1_3」
	・2024年12月13日	「FreeBSD 14.2 RELEASE」	「py39-qtile-0.18.1_3」
	・2025年 3月31日	「FreeBSD 13.5 RELEASE」	「py39-qtile-0.18.1_4」
	・2025年 6月19日	「FreeBSD 14.3 RELEASE」	「py39-qtile-0.18.1_4」
	・2026年 4月 2日	「FreeBSD 14.4 RELEASE」	「py311-qtile-0.33.0」

 2026年6月9日の時点で、「qtile」は下記のバージョンでした。


$ pkg info py311-qtile
py311-qtile-0.33.0
Name           : py311-qtile
Version        : 0.33.0
Installed on   : Tue Jun  9 17:02:08 2026 JST
Origin         : x11-wm/qtile
Architecture   : FreeBSD:15:*
Prefix         : /usr/local
Categories     : x11-wm
Licenses       : MIT
Maintainer     : ericbsd@FreeBSD.org
WWW            : http://qtile.org
Comment        : Small, flexible, scriptable tiling window manager written in Python
Options        :
        DOCS           : on
Annotations    :
        build_timestamp: 2026-05-23T05:52:58+0000
        built_by       : poudriere-git-3.4.8
        flavor         : py311
        port_checkout_unclean: no
        port_git_hash  : 78db3aeaafd6e8351d3fa52693f922e0020da12f
        ports_top_checkout_unclean: no
        ports_top_git_hash: 530483d57eeee02f07bd6ab97a8d045b2d8913fd
        repo_type      : binary
        repository     : FreeBSD-ports
Flat size      : 6.50MiB
Description    :
Qtile is simple, small, and extensible. It's easy to write your own layouts,
widgets, and built-in commands.

Qtile is written and configured entirely in Python, which means you can
leverage the full power and flexibility of the language to make it fit your
needs.


3. SDDM カスタマイズ

 ログイン画面の解像度を「1366x768」とし、キーボードレイアウトを「jp.106」にします。
 「root」ユーザ権限で。


sh
cat << 'EOF' >>  /usr/local/share/sddm/scripts/Xsetup

xrandr --output VGA-0 --mode 1366x768 --rate 60
setxkbmap -layout jp
EOF
exit


 ログイン画面のテーマとカーソルを変更します。
 「root」ユーザのまま


sddm --example-config > /usr/local/etc/sddm.conf
vi /usr/local/etc/sddm.conf


[Theme]
# Current theme name
Current=breeze

# Cursor size used in the greeter
CursorSize=

# Cursor theme used in the greeter
CursorTheme=breeze_cursors


 を下記へ変更します。


[Theme]
# Current theme name
Current=sddm-freebsd-black-theme

# Cursor size used in the greeter
CursorSize=

# Cursor theme used in the greeter
CursorTheme=Neutral++_White


 2026年6月9日の時点で、ここまでの設定では、思い通りにならないので。
 「デスクトップ環境構築 - 共通事項 - ログインマネージャ - SDDM」の「FreeBSD 14.4 RELEASE 以降」のページを参照し。
 記述してある内容を適用します。

4. ユーザ用初期化ファイルの作成

 日本語環境を有効にします。
 「root」ユーザ権限で。


sh
cat << 'EOF' >> /etc/profile

export LC_ALL=ja_JP.UTF-8
export LANGUAGE=ja_JP.UTF-8
export LANG=ja_JP.UTF-8
EOF

cat << 'EOF' >> /etc/csh.cshrc

setenv LANG             ja_JP.UTF-8
setenv LANGUAGE         ja_JP.UTF-8
setenv LANG             ja_JP.UTF-8
EOF

cat << 'EOF' >> /usr/share/skel/dot.xsession
#!/bin/sh

numlockx &
export DESKTOP_SESSION=qtile
(sleep 3 && setxkbmap -layout jp) &

qtile start
EOF
exit

chmod +x /usr/share/skel/dot.xsession


 既存のログインユーザで、まず、「xsession」をスケルトンよりコピー。


cp /usr/share/skel/dot.xsession ~/.xsession


 ログインユーザ用の起動時のスクリプトをシステムファイルからコピーします。


mkdir -pv ~/.config/qtile/
cp /usr/local/lib/python3.11/site-packages/libqtile/resources/default_config.py ~/.config/qtile/config.py


5. ログインマネージャ起動

 前項までインストール・設定したものを有効にして、起動します。
 「root」ユーザ権限で。


sysrc dbus_enable=YES
sysrc sddm_enable=YES


service dbus start
service sddm start


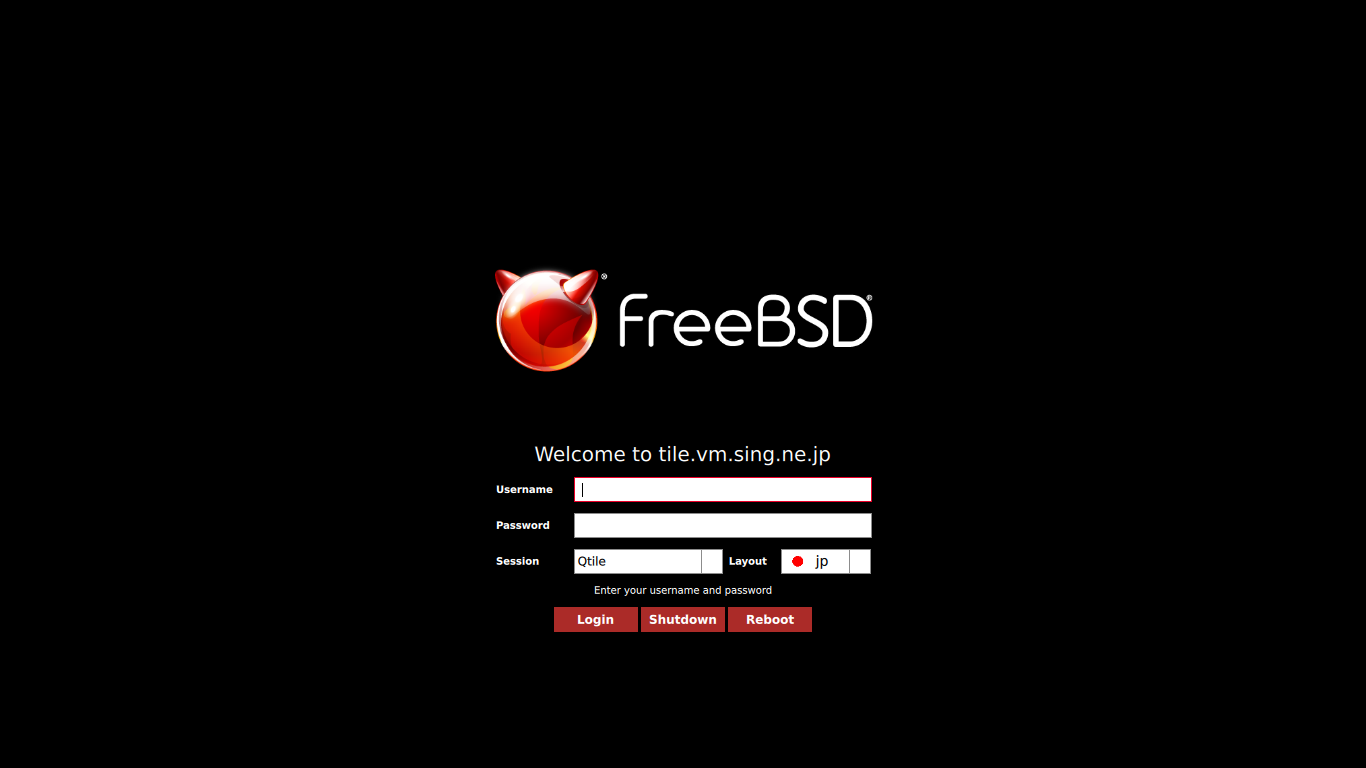
 うまく設定できていれば、ログイン画面が表示されます。
 「Qtile」でログインします。
 ユーザ名・パスワードを入力してログインします。