- 1. 概要
- 2. clamav インストール
- 3. simscan インストール
- 4. clamav 設定
- 5. clamav ログ設定
- 6. simscan 設定
1. 概要

 ウィルススキャンの設定を行います。
 ウィルススキャンは、完全なものではありませんが、既知のウィルスであれば、クライアントマシンをウィルスメールの攻撃から守ってくれるでしょう。

 アンチウィルスソフトとスキャナーとを組み合わせて使います。
 ここでは、「ClamAV」と「simscan」という組み合わせを使用する方法を紹介します。

 「clamav」、「simscan」の順にインストールします。

2. clamav インストール


cd /usr/ports/security/clamav
make config


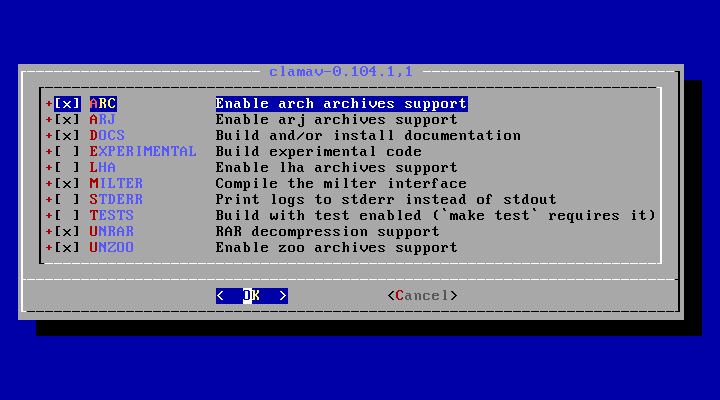
 デフォルトのオプションを掲載します。
 「FreeBSD 12.2 RELEASE」の時点では、2ページありましたが、少しオプションが減ったのか、1ページになりました。

 前は、「ICONV」というオプションがあったのですが、なくなりました。
 デフォルトのままにしておきます。


cd /usr/ports/security/clamav
make
make install


 インストール時のメッセージを残しておきます。


===>  Installing for clamav-0.104.1,1
===>  Checking if clamav is already installed
===>   Registering installation for clamav-0.104.1,1
Installing clamav-0.104.1,1...
===> Creating groups.
Creating group 'clamav' with gid '106'.
Using existing group 'mail'.
===> Creating users
Creating user 'clamav' with uid '106'.
Adding user 'clamav' to group 'mail'.
===> SECURITY REPORT:
      This port has installed the following files which may act as network
      servers and may therefore pose a remote security risk to the system.
/usr/local/sbin/clamd

      If there are vulnerabilities in these programs there may be a security
      risk to the system. FreeBSD makes no guarantee about the security of
      ports included in the Ports Collection. Please type 'make deinstall'
      to deinstall the port if this is a concern.

      For more information, and contact details about the security
      status of this software, see the following webpage:
https://www.clamav.net/


 「FreeBSD 12.2 RELEASE」時とリビジョン番号が異なっています。

3. simscan インストール


cd /usr/ports/mail/simscan
make config


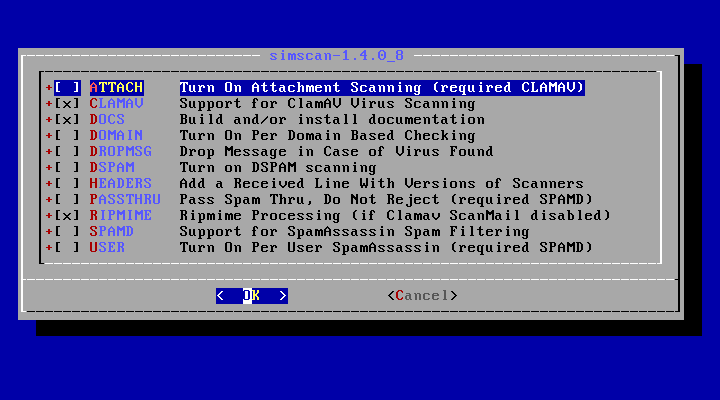
 「simscan」のオプションについてわたしのお勧めは以下にチェックをいれて他を外します(掲載の画像はデフォルトの状態)。
| ・CLAMAV | clamav でチェックする上で必須 |
| ・HEADERS | 受信ヘッダに simscan のバージョンや処理時間を挿入します |
| ・PASSTHRU | チェックを入れないと誤認識であっても spam と判断したメールは削除されます |
| ・RIPMIME | |
| ・SPAMD | 「SpamassAssin」を動作させる上で必須 |
| ・USER | |

cd /usr/ports/mail/simscan
make
make install


 インストール時のメッセージを残しておきます。


===>  Installing for simscan-1.4.0_8
===>  Checking if simscan is already installed
===>   Registering installation for simscan-1.4.0_8
Installing simscan-1.4.0_8...
===> Creating groups.
Creating group 'simscan' with gid '74'.
===> Creating users
Creating user 'simscan' with uid '74'.
NOTES:

* You have to configure your anti-virus and anti-spam products!

* You have to modify your qmail startup files to call simscan.
In most cases, you just need to edit /var/qmail/tcp.smtp in
order to call simscan instead of qmail-queue, by setting up
QMAILQUEUE variable. For example:

127.0.0.1:allow,RELAYCLIENT=""
192.168.0.:allow,RELAYCLIENT="",QMAILQUEUE="/var/qmail/bin/simscan"
:allow,QMAILQUEUE="/var/qmail/bin/simscan"

* Don't forget to rebuild tcp.smtp.cdb from new tcp.smtp using tcprules!

* Also, read documentation about how to configure
attachment blocking and per domain processing.
Additional documentation can be found here:
http://qmailwiki.inter7.com/index.php?title=Simscan
===>   NOTICE:

The simscan port currently does not have a maintainer. As a result, it is
more likely to have unresolved issues, not be up-to-date, or even be removed in
the future. To volunteer to maintain this port, please create an issue at:

https://bugs.freebsd.org/bugzilla

More information about port maintainership is available at:

https://docs.freebsd.org/en/articles/contributing/#ports-contributing


 「FreeBSD 12.2 RELEASE」インストール時と同じバージョン番号です。

4. clamav 設定

 「freshclam」が参照するデータベースサーバを日本国内のものにします。


vi /usr/local/etc/freshclam.conf


DatabaseMirror database.clamav.net


 を下記に書き換えます。


DatabaseMirror db.jp.clamav.net


 「clamav」が「simscan」経由で動作するように設定します。


vi /usr/local/etc/clamd.conf


# Uncomment this option to enable logging.
# LogFile must be writable for the user running daemon.
# A full path is required.
# Default: disabled
LogFile /var/log/clamav/clamd.log


# This option allows you to save a process identifier of the listening
# daemon (main thread).
# This file will be owned by root, as long as clamd was started by root.
# It is recommended that the directory where this file is stored is
# also owned by root to keep other users from tampering with it.
# Default: disabled
PidFile /var/run/clamav/clamd.pid


# Path to a local socket file the daemon will listen on.
# Default: disabled (must be specified by a user)
LocalSocket /var/run/clamav/clamd.sock


# Run as another user (clamd must be started by root for this option to work)
# Default: don't drop privileges
User clamav


 の箇所をそれぞれ


# Uncomment this option to enable logging.
# LogFile must be writable for the user running daemon.
# A full path is required.
# Default: disabled
LogFile /var/log/simscan/clamd.log


# This option allows you to save a process identifier of the listening
# daemon (main thread).
# This file will be owned by root, as long as clamd was started by root.
# It is recommended that the directory where this file is stored is
# also owned by root to keep other users from tampering with it.
# Default: disabled
PidFile /var/run/simscan/clamd.pid


# Path to a local socket file the daemon will listen on.
# Default: disabled (must be specified by a user)
LocalSocket /var/run/simscan/clamd.sock


# Run as another user (clamd must be started by root for this option to work)
# Default: don't drop privileges
User simscan


 に書き換えます。
 こうすると「clamav_clamd」が「simscan」のユーザで動作しますので、ログファイルや「pid」ファイル用のディレクトリを「simscan」用に作成します。


mkdir -pv /var/log/simscan
chown -v simscan:simscan /var/log/simscan
mkdir -pv /var/run/simscan
chown -v simscan:simscan /var/run/simscan


 「clamav」が動作するようにします。


sysrc clamav_freshclam_enable=YES
sysrc clamav_clamd_enable=YES
sysrc clamav_clamd_user=simscan


 ウィルスパターンのデータベースを取得します。


freshclam


 以下で起動します。


service clamav-freshclam start
service clamav-clamd     start


5. clamav ログ設定

 「clamav-freshclam」「clamav-clamd」のログが、以下に作成されます。


/var/log/clamd/freshclam.log	←	freshclam のログ
/var/log/simscan/clamd.log		←	clamd     のログ


 いずれもデフォルトで「1MB (1M = 1m = 1048576 bytes)」を超えるとローテーションします。
 ただし、上限なくファイルが増えるようなので何か対策するように考えていますが、いまのところ年間2~3ファイルなので手は打っていません。

 ローテーションするサイズを変えるには下記のそれぞれの設定ファイルの


/usr/local/etc/freshclam.conf	←	freshclam の設定ファイル
/usr/local/etc/clamd.conf		←	clamd     の設定ファイル


 それぞれに同じ記述があります。


# Maximum size of the log file.
# Value of 0 disables the limit.
# You may use 'M' or 'm' for megabytes (1M = 1m = 1048576 bytes)
# and 'K' or 'k' for kilobytes (1K = 1k = 1024 bytes).
# in bytes just don't use modifiers. If LogFileMaxSize is enabled,
# log rotation (the LogRotate option) will always be enabled.
# Default: 1M
#LogFileMaxSize 2M


 「#LogFileMaxSize 2M」のコメント用の # をはずしてローテーションするサイズを変えてやれば、反映されます。

6. simscan 設定

 「simscan」が、メールキュー起動時に動作するようにするには「2.4 不正中継させないための設定」で作成したファイルを編集します。


vi /etc/tcp/tcp.smtp


 以下のように書き換えます。


127.:allow,RELAYCLIENT=""
192.168.0.:allow,RELAYCLIENT="",QMAILQUEUE="/var/qmail/bin/simscan"
xxx.yyy.zzz.0-8:allow,RELAYCLIENT="",QMAILQUEUE="/var/qmail/bin/simscan"
:allow,QMAILQUEUE="/var/qmail/bin/simscan"


 書き換えたら、以下をまた行うことをお忘れなく。


tcprules /etc/tcp/tcp.smtp.cdb /etc/tcp/tcp.smtp.tmp < /etc/tcp/tcp.smtp
|