- 1. インストール
- 2. apache 定義ファイルの編集
- 3. webalizer.conf の編集
- 4. 解析ファイルの作成
1. インストール


cd /usr/ports/www/webalizer
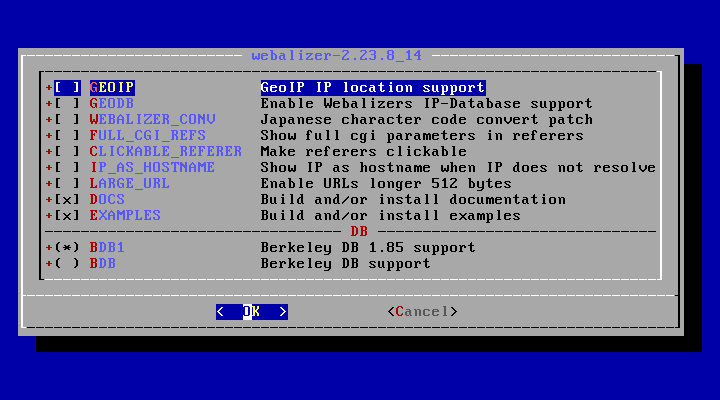
make config


 オプションで、「WEBALIZER_CONV」を有効にすることにより、日本語の文字化けを防ぎます。

cd /usr/ports/www/webalizer/
make
make install


 2020年7月21日の時点で、下記のバージョンでした。


$ pkg info webalizer
webalizer-2.23.8_14
Name           : webalizer
Version        : 2.23.8_14
Installed on   : Tue Jul 21 11:44:09 2020 JST
Origin         : www/webalizer
Architecture   : FreeBSD:11:amd64
Prefix         : /usr/local
Categories     : www
Licenses       : GPLv2
Maintainer     : dinoex@FreeBSD.org
WWW            : http://www.mrunix.net/webalizer/
Comment        : Web server log file analysis program
Options        :
        BDB            : off
        BDB1           : on
        CLICKABLE_REFERER: off
        DOCS           : on
        EXAMPLES       : on
        FULL_CGI_REFS  : off
        GEODB          : off
        GEOIP          : off
        IP_AS_HOSTNAME : off
        LARGE_URL      : off
        WEBALIZER_CONV : on
Shared Libs required:
        libgd.so.6
        libpng16.so.16
Annotations    :
        FreeBSD_version: 1104001
Flat size      : 443KiB
Description    :
What is The Webalizer?
----------------------

A fast, free web server log file analysis program.  Produces
HTML output for viewing with a web browser.  Written in C on
a Linux platform, however designed to be as ANSI/POSIX
compliant as possible so porting to other UNIX platforms should
be painless.  Binary distributions for most popular platforms
are available.  Features multiple language support, incremental
processing capabilities, reverse DNS lookup support, export via
tab separated ascii files to popular databases and spreadsheets,
and much more.  Supports standard CLF and combined logs, as well
as wu-ftpd xferlog and squid proxy logs, which can be either in
standard text format or gzip compressed.

Keywords:      Web Analysis, Log Analysis, Usage Statistics, Linux, Unix

WWW: http://www.mrunix.net/webalizer/


2. apache 定義ファイルの編集

 解析結果を見る場所を「/usr/local/www/webalizer/」として、ディレクトリを作成します。


mkdir -pv /usr/local/www/webalizer


 その「URL」を「http://www.hogehoge.ne.jp/」とするならば、
 「apache」の定義ファイルを作成してアクセスできるようにします。


vi /usr/local/etc/apache24/Includes/webalizer.conf


 (ファイル名は何でもよい)以下のように編集します。


Alias /webalizer 	"/usr/local/www/webalizer/"

<Directory "/usr/local/www/webalizer/">
    DirectoryIndex  index.html
    Options +ExecCGI
    AllowOverride None
    Require all granted
</Directory>


 7行目は、実際は「all」でなく、何らかの制限をかけるべきです。

 「apache24」を再起動します。


service apache24 configtest
service apache24 graceful


3. webalizer.conf の編集


/usr/local/etc/webalizer.conf-dist


 というコンフィグレーションファイルのサンプルがあります。
 これを「webalizer.conf」にコピーして編集します。


cp /usr/local/etc/webalizer.conf-dist /usr/local/etc/webalizer.conf
vi /usr/local/etc/webalizer.conf


 最低限必要な編集は下記の通りです。


LogFile        /var/lib/httpd/logs/access_log	← 	コメントをはずし
													ログのファイル名を絶対パスで記述します(ワイルドカード可)

# LogType defines the log type being processed.  Normally, the Webalizer
# expects a CLF or Combined web server log as input.  Using this option,
# you can process ftp logs (xferlog as produced by wu-ftp and others),
# Squid native logs or W3C extended format web logs. Values can be 'clf',
# 'ftp', 'squid' or 'w3c'.  The default is 'clf'.

#LogType        clf

# OutputDir is where you want to put the output files.  This should
# should be a full path name, however relative ones might work as well.
# If no output directory is specified, the current directory will be used.

OutputDir      /var/lib/httpd/htdocs/usage		← 	コメントをはずしドキュメント出力先を記述します
													例題に沿えば "/usr/local/www/webalizer" です


4. 解析ファイルの作成

 解析ファイルを出力します。


/usr/local/bin/webalizer -c /usr/local/etc/webalizer.conf


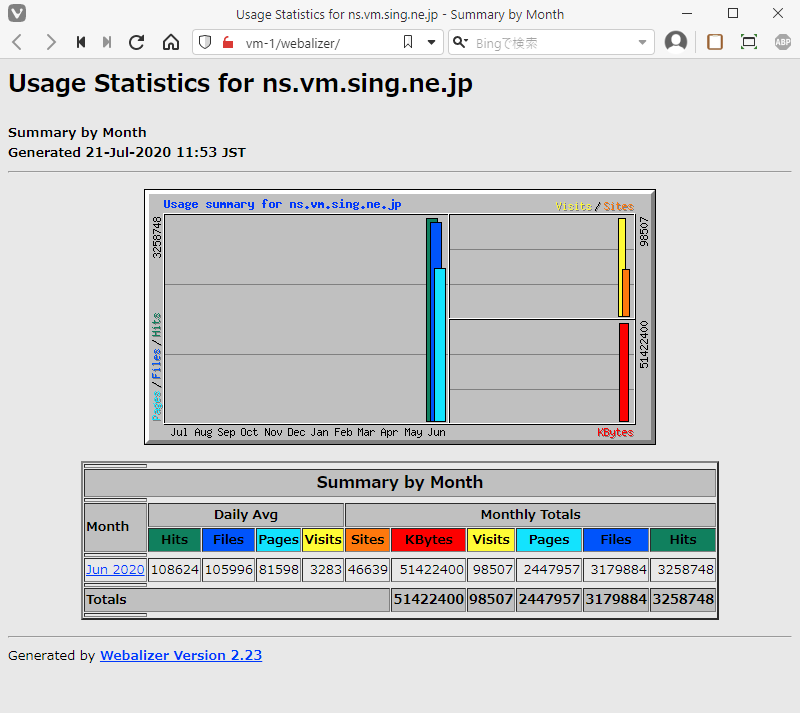
 結果がうまく作成されれば


http://www.ドメイン/webalizer/


 にアクセスすることでログの解析結果を見ることができるようになります。

 ほんのさわりですが・・・こんな感じ・・・。

あとはこれらの一連の作業をスクリプト化して「crontab」に記述することで、定期的にログ解析することができるようになります。
|